David Linsin
06.05.2010How to add a "Find Your Company" feature to your iPhone App – Part I
We wanted to give our users the possibility to find our office. On the iPhone, the simplest way to do it, is to use Google Maps and the MapKit framework. I won’t go into the details of MapKit here, since Apple’s documentation is awesome and they provide a lot of sample code, which gets you up and running in no time.
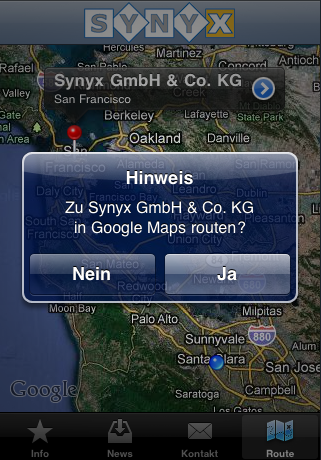
What I’d like to show you today, is some code, which nicely zooms the Map to your office and current location of the App user, once the MapView is loaded. Here are a couple of screenshots to give you an idea of what I’m talking about:
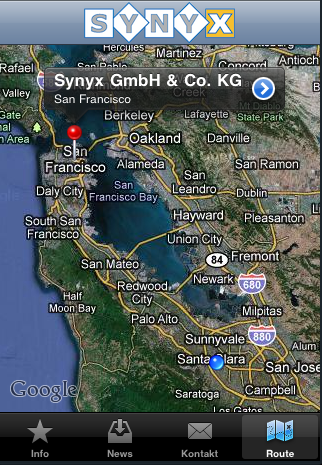
 As you can see, Synyx moved their offices to San Francisco. The iPhone App user, with the blue dot, is currently in
cupertino. If he taps on the white/blue arrow in the annotation of the red dot, he is asked whether he’d really want to
leave the App and start Google Maps to route from his current location to the Synyx Offices in San Francisco.
As you can see, Synyx moved their offices to San Francisco. The iPhone App user, with the blue dot, is currently in
cupertino. If he taps on the white/blue arrow in the annotation of the red dot, he is asked whether he’d really want to
leave the App and start Google Maps to route from his current location to the Synyx Offices in San Francisco.
Now, the main focus on this blog post is how to get you using this in your App. I’m gonna split this little tutorial in 2 parts:
- Showing the Synyx Offices on the Map
- Zooming in, so that everything fits on the screen
If you feel like going off on your own, the code for the UIViewController used, is available for download on github. The zooming algorithm is borrowed from stackoverflow. However, the code is one of my first iPhone projects and not polished, so don’t use it blindly. There are a couple of issue, e.g. I’m pretty sure it won’t survive a memory warning. It’s meant for demonstration solely!
So let’s get into it. We first need a UIViewController with a MapView associated. It is pretty straightforward and you should have no problems doing that in Interface Builder. The next thing you need and that is missing from the code on github is a custom MapKit annotation:
@interface AddressAnnotation : NSObject<MKAnnotation> {
   CLLocationCoordinate2D coordinate;
   NSString *title;
   NSString *subtitle;
}
- (id)initWith:(CLLocationCoordinate2D)_coords;
@property(retain,nonatomic) NSString *title;
@property(retain,nonatomic) NSString *subtitle;
@end
This will be responsible for displaying the name and city of the Synyx Offices above the red pin on the map. But it’s only responsible for displaying the information, it doesn’t know where yet. In order to find the location of our offices using the Google Maps API, I came up with a little helper method called synyxLocation (line 175). It simply returns the CLLocationCoordinate2D struct, which is needed in our AddressAnnotation.
CLLocationCoordinate2D location = [self synyxLocation];
self.synyx = [[AddressAnnotation alloc] initWith:location];
[self.synyx setTitle:@"Synyx GmbH & Co. KG"];
[self.synyx setSubtitle:synyxLoc];
[mapView addAnnotation:synyx];
Instantiating the AddressAnnotation with the previously determined location and adding it to the MapView will to the rest. I did this in the viewDidLoad of the UIViewController, which is not be the best place. Maybe the viewWillAppear method would have been better.
After adding those parts discussed above, you can fire up the Simulator and get the location of our offices with a red pin and your current location (in the Simulator it’s always Cupertino). The map doesn’t zoom yet and is not properly located, we leave that to our next installment.