Tobias Knell
17.08.2016Android: Building APKs for different environments using build types and product flavors
Different build types in android can be used to build the same application with different configurations. This can be predefined config values like ‘debuggable’, but you can also define your own config values that will be accessible in your application. This post will show you some ways in which you can use this functionality to easily build your app for different environments of remote services and for better local development.
Build types:
Each android project comes with some default build types:
- debug -> for development and debugging on devices
- test -> for running unit tests
- androidTest -> for running device tests
- release -> for the actual release version of the app
A freshly created build.gradle, has the following build types defined:
    buildTypes {
        release {
            minifyEnabled false
            proguardFiles getDefaultProguardFile('proguard-android.txt'), 'proguard-rules.pro'
        }
    }
The default build types don’t need to be declared, but you can declare them in order to extend them with custom config.
Different environments
Let’s say we are developing a web service and want users to interact with this service via our android app. We have multiple environments for this service to be able to test it before deploying to production. Namely, we have a test system, a staging system, and a production system. We can also start this service on our local machine, to test the local changes we made on the service or the app.
Furthermore, we don’t want to be dependent on a remotely running system or on a locally running service, if we are only improving the android app on parts that don’t interact with the web service.
In order to let some people test the application before releasing it, we want to be able to distribute versions for the test and stage systems as a beta app via google play.
The above requirements result in the following build types:
- test system
- stage system
- production sytem -> we can just use the default release build type
- local service
- no service at all -> mocked services
Different URLs based on the build type
The first three are the most trivial to achieve. The build types allow us to define custom fields (buildConfigField) for our application, which we can use to have a differnt URL for each of the environments. A buildConfigField receives 3 parameters: the type of the field, the name of the field, and the value of the field. This field will then be put into a BuildConfig java class that is generated on build time.
Note, that the exact value of the buildConfigField is copied into the generated java class, so if we define Strings, we have to put the double quotes around the String for it to be correct. So the values of the String buildConfigFields in the build.gradle are wrapped by single quotes, as well as double quotes – single quotes for the gradle file and double quotes for the resulting java class.
The local service can be configured in a very similar way, we just can’t use a static URL or IP, since we want it to point to the host of the developer that built the app, and not just a single host. Luckily, we can use some code in the gradle file 🙂 If we use ‘InetAddress.getLocalHost().getCanonicalHostName()’ in the build, we get the host that ran the build.
To be sure which app is currently running, we also put an ‘environment’ field to each build type, which can be appended to the title of the app (except for the release build) to avoid mistakenly testing on the wrong environment.
The builds for test, stage and production should be all built with the release certificate, since we want to upload them to the playstore.
With these additions applied, our builtTypes look like this:
    buildTypes {
        local{
            debuggable true
            signingConfig signingConfigs.debug
            buildConfigField 'String', 'ENVIRONMENT', '"LOCAL"';
            buildConfigField 'String', 'API_URL', '"http://'+ InetAddress.getLocalHost().getCanonicalHostName() + ':8080/"';
        }
        tst{ // build types may not start with 'test'
            debuggable true
            signingConfig signingConfigs.release
            buildConfigField 'String', 'ENVIRONMENT', '"TEST"';
            buildConfigField 'String', 'API_URL', '"https://my-service-test.mydomain/"';
        }
        stage{
            debuggable true
            signingConfig signingConfigs.release
            buildConfigField 'String', 'ENVIRONMENT', '"STAGE"';
            buildConfigField 'String', 'API_URL', '"https://my-service-stage.mydomain/"';
        }
        release {
            debuggable false
            minifyEnabled false
            signingConfig signingConfigs.release
            proguardFiles getDefaultProguardFile('proguard-android.txt'), 'proguard-rules.pro'
            buildConfigField 'String', 'ENVIRONMENT', '"PROD"';
            buildConfigField 'String', 'API_URL', '"https://my-service.mydomain/"';
        }
    }
After syncing the gradle file, we can access the URL in the java code through the BuildConfig class and don’t need any code to differentiate between the environments, as this URL is based on the buildType that we selected.
BuildConfig.API_URL
Mocked Services
For the mocked services, I’ll provide you with two different approaches, which both have their upsides and downsides.
The first approach is to use more build types.
The second approach is using two product flavors.
Mocked Services via build type
We add the config we need to the ‘debug’ buildType:
    buildTypes {
        debug{
            buildConfigField 'String', 'ENVIRONMENT', '"DEV"';
            buildConfigField 'String', 'API_URL', '"https://not.really.needed/"';
        }
        ...
    }
As we’ve already defined the ‘environment’ as a buildConfigField, we can just use it in our code to decide whether we should use the real service calls or the mocked services.
Personally, I like to use a custom Application class in order to provide singleton instances of the Services I use in an android app, so I’ll just use this approach to illustrate the use of the mocked services.
We create a DemoService interface with two implementations, one for calling the web api, and one mocked implementation, returning only static data. Depending on the set ‘environment’, we use the appropriate implementation of the service.
public class DemoApplication extends Application {
    private DemoService demoService;
    public DemoService getDemoService() {
        if (demoService == null) {
            demoService = createDemoService();
        }
        return demoService;
    }
    private DemoService createDemoService() {
        if ("DEV".equals(BuildConfig.ENVIRONMENT)) {
            return new DemoServiceMockImpl();
        } else {
            return new DemoServiceWebApiImpl();
        }
    }
}
With this approach, we have to make sure that the DemoApplication is the only place, where an instance of this service is created.
Upsides:
- Easy configuration
- Fast build speed (+1 build type = +1 APK to build)
Downsides:
- We need to check the environment in the code
- We ship the mock code in the production APK
Mocked Services via product flavors
In this approach, instead of adding a new buildType, we add a build flavor:
    productFlavors {
        webApi {}
        mock {}
    }
We can still use the application to provide a singleton of our service, but we don’t have to check the environment anymore, since with product flavors, we can place different implementations with the same filename in each product flavor.
public class DemoApplication extends Application {
    private DemoService demoService;
    public DemoService getDemoService() {
        if (demoService == null) {
            demoService = new DemoServiceImpl();
        }
        return demoService;
    }
}
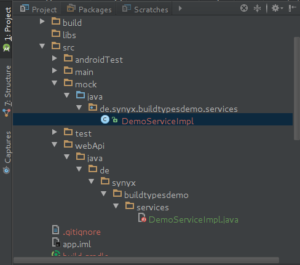
We’ll put one DemoServiceImpl into the ‘src/main/webApi/’ directory and another one into the ‘src/main/mock/’ directory, as those directories represent the specific code for the product flavor.
Note that you can’t put two java classes, which have the same name, into main as well as into a product flavor. Java classes can’t be overridden by product flavors, only resources can.

public interface DemoService {
    /**
    * @return list of stuff, may be empty
    */
    List<String> getStuff();
}
webApi:
public class DemoServiceImpl implements DemoService {
    @Override
    public List<String> getStuff() {
        List<String> stuff = new ArrayList<>();
        // do web request and put the results into 'stuff'
        return stuff;
    }
}
mock:
public class DemoServiceImpl implements DemoService {
    private static List<String> stuff = new ArrayList<>();
    public DemoServiceImpl() {
        stuff.add("foo");
        stuff.add("bar");
        stuff.add("baz");
    }
    @Override
    public List<String> getStuff() {
        return stuff;
    }
}
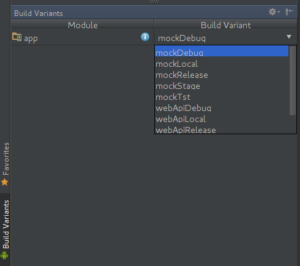
For a class in the respective product flavor to be included in the class path of the project in the IDE (thus enabling all the nice and fancy IDE features for it), a build type that uses this product flavor needs to be selected. As you may have noticed, each of the defined buildTypes is now present twice in the build types dropdown, once for each product flavor. This also means that if you build the app via ‘./gradlew build’, each of the buildTypes will be built once for every product flavor, effectively doubling the build time. If you only selectively build single build types, this should be no problem.

- No code checks needed (for this usecase of product flavors)
- Clean separation of release code and mock code
Downsides:
- Configuration and development are a bit trickier
- Slower build speed (For each product flavor, an APK for every buildType is built)
- Compilation errors in currently unused flavors may go unnoticed, as the classes in unused flavors aren’t compiled
That’s it
Which of the two methods you want to use, is up to you. I prefer the former approach, but in an app that makes more use of product flavors as of buildTypes, I’d use the latter one.
More details on the build types and product flavors can be found in the official documentation.
As always, feel free to share your questions, thoughts and better approaches in the comments 🙂