Karl-Ludwig Reinhard
10.06.2022What you can do with your turing pi2?
What’s this about?
I’ve received several months ago a turing pi 2 board! I’ve blogged about the basic features and I was thinking a long time “what can I do with it?”
– Another post about running kubernetes? meh, there are many very good articles about running k8s on turing pi
– Another post about integrating it into our build chain? meh – same but different. Maybe a short one for another time
– Maybe a post how we can use it as a base for a part of high availability IoT devices?
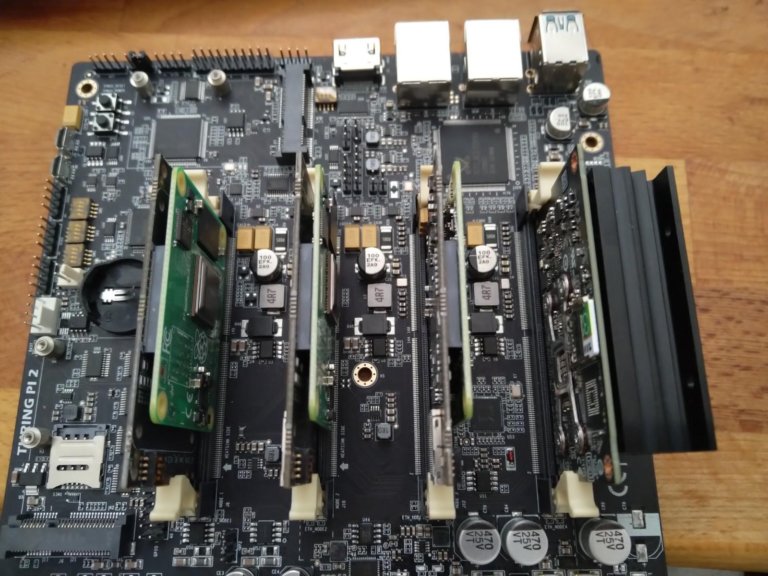
Then I’ve changed my thought pattern. What are the new features compared with the turing pi1?
– Sim Card
– Jetson compability
– Dual ethernet
– 2x Mini PCI Express
– 2x sata ports
Then it hit me! The last two points! Let’s build a storage cluster with the turing pi2. I always wanted to play with a distributed file system like glusterfs.
Why took it so long?!
At synyx we’re an it service provider specialized in software development and operations(preferably devops :)) and work tightly together with our customers. At the current project there were several on-site doings and was a bit stressful. So activities like blogging, creating or evaluating ideas had to be postponed. Maybe you know you don’t have endless time or mental capacity 🙂
What I am planning to do with it
I plan to use it primarily for my on site workstation’s backups. Currently most of the time I work from home as many other working in the it business. Pre-coivd most of the time I worked at our nice office but it has changed. For socializing the office is really great or sharing and discussing ideas. But when I need to do a longer development iteration or writing blog articles like this I prefer working from home. But doing a backup via a wan connection is a pain – at least in germany. So currently I’m using an external SSD for backups – not great, not terrible 🙂
I plan to use my turing pi2 as a target for my backups. I like to continue using restics – maybe also use it as a data storage for some pictures and movies. We’ll see.
The plan is to build a glusterfs spanning across 3 nodes with attached sata drives. A better performance is a nice addon but data integrity and failure tolerance is the real deal for me 🙂
Getting started
My preferred automation tool is ansible. It’s not perfect and I’m not a big fan of yaml files and python. But it has a great community, supported by red hat, a lot of modules and good documentation and it’s battle proven. Aaaaand it got a glusterfs module 🙂 You can easily install it via ansible-galaxy:
ansible-galaxy collection install gluster.gluster
For verifying that my setup works I prefer to work with virtual maschines. So let’s build a template vm. The idea is to be as close as possible to the target os(raspberry os)
– Create a maschine with two network interfaces as a template
— one for accessing the internet(in vbox NAT)
— one internal network between the nodes(in vbox internal network)
Yes – you can all do this by using one interface. But doing some experiments it eases some tasks.
– Install debian
– Copy some essentials like ssh pubkey
When testing the playbook:
– Clone the template maschine 3 times
– Do a snapshot and call it like initial, raw or whatever you like
– Start all machines
– Apply playbook, change it, revert to snapshot if needed and repeat until it matches your expectations
The playbook.
It’s really simple. We only have the following files:
hosts.ini – An inventory with 3 nodes
[gluster]
gluster01 ansible_host=192.168.56.102
gluster02 ansible_host=192.168.56.103
gluster03 ansible_host=192.168.56.104
roles/hostname – Role for setting the hostname according to the inventory. Just for convenience. If you are interested in the details let me know.
roles/glusterfs – Role for setting up the gluster – This is for our setup the most interesting part – even it’s really simple 🙂
---
# (1)
- name: Install Packages
  apt:
    name:
    - glusterfs-server
    state: present
  become: yes

# (2)
- name: set fact for gluster peers
  set_fact:
    cluster_peers: "{{ groups['gluster'] | map('extract', hostvars, ['ansible_host']) | join(',') }}"

# (3)
- name: Enable and start glusterfs server
  systemd:
    state: restarted
    enabled: yes
    daemon_reload: yes
    name: glusterd
  become: yes

# (4)
- name: Pause for 10 sec
  pause:
    seconds: 10

# (5)
- name: create gluster volume
  gluster.gluster.gluster_volume:
    state: present
    name: test2
    bricks: /testVolume2
    disperses: 3
    cluster: "{{ cluster_peers.split(',') }}"
    force: yes
  run_once: true
  become: yes
(1) Install glusterfs. No need for adding a separate repo
(2) This is a little bit of a hack – I’m not really fit with jinja2 templates. For later (5) we need all ip addresses/ansible_host vars in a list. Putting it directly to (5) ended in a type error. But with this workaround it works
(3) Enable the glusterfs service so it’s reboot safe and start the server
(4) Wait some time to ensure all glusterd instances are running completly.
(5) Create a glustervolume. Currently we use disperses volume. See https://docs.gluster.org/en/v3/Administrator%20Guide/Setting%20Up%20Volumes/ – Creating Distributed Dispersed Volumes
The attribute cluster contains a list of all peers based on the inventory(see 2). Currently on all peers the same directory is used as a brick. I also use the force parameter because the brick is on the root partition.
site.yml – Description that two roles should be applied to hosts
That’s all! Let’s apply it to our virtual maschines with:
ansible-playbook -i hosts.ini site.yml
When ansible completed successfully let’s try to mount the volume from your workstation:
mount -t glusterfs nodeIpOrName:/test2 /glusterfs/
If you encounter a problem regarding utime and ctime do(have a look at your log as the failure command suggests):
for volname in gluster volume list; do gluster volume set $volname ctime off; done
see: https://github.com/gluster/glusterfs/issues/658
As always there is room for improvement:
– Automate the creation of the inventory
– cloning/creation of the virtual machines
– Build a CI/CD pipeline with automatic creation of the vms, applying the role
– Do some basic system tests
Apply it to the real thing
Because (at least for me) the playbook is now working I switched only to the ip addresses of the turing pi nodes. This can be easily done with a separate inventory – I called it hosts_tpi2.ini
[gluster]
gluster01 ansible_host=192.168.2.96
gluster02 ansible_host=192.168.2.133
gluster03 ansible_host=192.168.2.215
It’s now idiomatic to apply this to your turing pi.
ansible-playbook -i hosts_tpi2.ini site.yml
That’s it – maybe you have to tweak the used username in the site.yml. But nothing more.
I really like working this way and it reduces the turn around times a lot. First get it working on virtual machines and then deploy it to the real hardware. With that only the differences between the vm and the real hardware remains as a challenge. In this special case there are only remained the old datetime issue with the pis. But this can also be automated with a small role adding and configuring a valid ntp server.
Planned used hardware
As you know the whole business is struggling with supply chain issues. I’ve ordered 4 SSD drives but I don’t want to wait til the arrival. So this is more about the future plan. I think when the hardware arrives and is put into place I’ll write a short second part 🙂
Several days ago the great guys behind turing pi announced that you can upgrade your turing pi board to include nvme ports. So I’ve decided to use nvme based storage devices instead of 3.5″ based devices. This has serveral advantes for me:
– Smaller form factor overall and smaller cases can be used
– No additional power
– Easier access
– Maybe better overall performance
As SSDs I’ve ordered 4x Samsung 970 EVO plus 2 TB PCIe NVMe M.2 – we’ll see how good they perform.
But waiting til the new board arrives will take it time. So I’ve ordered some adapters and cables. For the mini pcie slots I’ve ordered an very simple adaptor board for mounting the nvm drives KALEA-INFORMATIQUE. Converter M.2. For getting the Sata ports working with nvme drives I chose a CY M.2 Msata SSD Adaptor.
One last funny thing
I want to close this blog article with a little funny thing you should be aware. The Turing Pi2 uses a daughter board for mounting the compute module. It’s important(at least in my revision) to mount the Compute Module right.
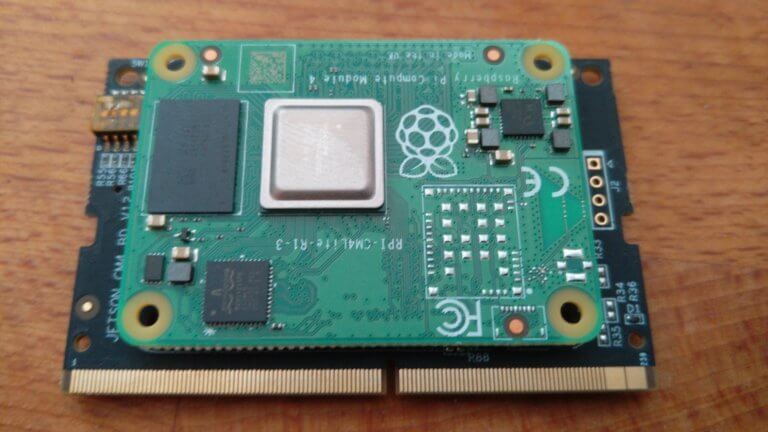
Right in this case means that the raspberry logo needs to be upside down! It took me some time to figure it out. The board was getting really hot when mounting it facing the raspberry up and I was worried that I bricked my board. Luckily it didn’t 🙂